How to Download Videos to your Computer
from a Digital Video Camera
When I bought my fancy digital video camera, I read the
thick manual extensively and nowhere was to be found any instructions how to download the
moving images to my computer. 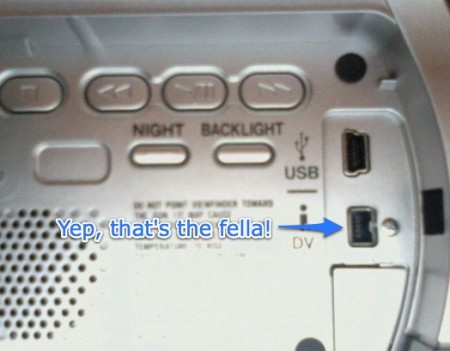 When I was at my cousin's and
promised to use my flair for electronics to do the same for her, I found the same problem!
Is it supposed to be some secret conspiracy that the manufacturers fail to instruct their
customers of this incredibly important point?? My guess is that the software that comes
with the camera isn't fancy enough to do that, for which reason they do not explain it.
Otherwise, they might be forced to suggest certain software for this purpose, and then
they would want money for making such a suggestion, and since they didn't receive the
money, or it would be too much hassle to go through the process and write up a contract
etc., they can just be lazy and not mention anything. Well, these pages are not reserved
for my opinions of mega large corporations in general, so I'll just fast forward to the
important and juicy parts.
And why not make yourself look like a genius while you at
it? In front of all your friends, casually pick up the device and start looking for any
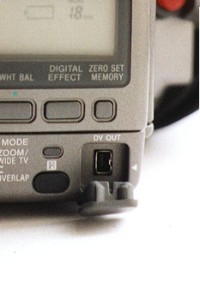
secret compartments. Maybe a very small flap that removes a part of the cover. Get
creative. Don't pull too hard but fidget the various parts which look like they could open
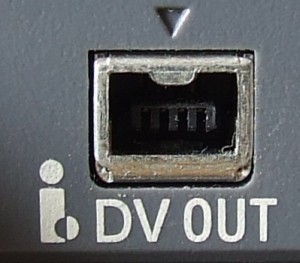
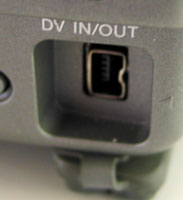
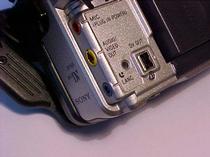
up until you find... the secret compartment of fancy input/output thingy wingies!
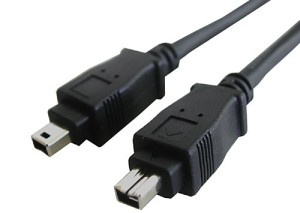
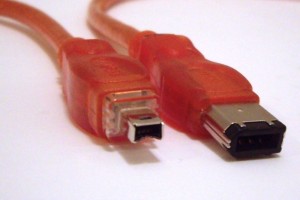
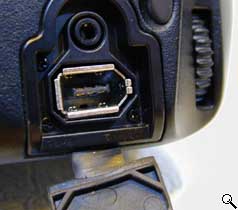
Once you find that, you should find the standard four pin firewire port. Yes, firewire,
which is supposed to be faster than USB2. On a desktop computer you might have a six pin
port (on a laptop generally also four), in which case you buy the four-pin to six-pin
cable. Just go to a good computer shop and explain to them your problem, I'm sure they
will be able to help you. And even sell you this rather expensive cable, agreeing to take
it back within 10 days if you fail miserably.
And what if your computer doesn't have a firewire port? 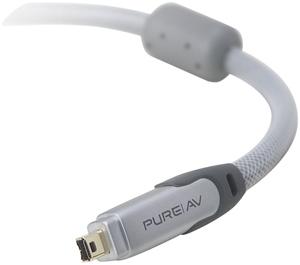 Well, run out and buy one
dingaling! For a desktop I just took apart the computer and slid it into the slots, and
the thing worked like a dream. Obviously you want to turn off and disconnect from the
power supply your computer before doing something like this, but I found this surprisingly
easy, at a time when I was generally scared to deal with hardware and taking apart
computers. You can even remove it and take it to your friend's computer etc.
If you want to use your laptop (not necessarily advisable - explained below), you can get
a PCMCI card (those things that look like a thick credit card and slide into that
horizontal empty slot on your laptop which you often wondered what the purpose of was for)
with firewire, or firewire and USB2 capability, if you desire that as well. But the reason
it is not so advisable to use your laptop for this, unless you have a really beally fast
laptop, is because once you want to export your created film to another format (such as an
.avi or .mpeg file, or a DVD you can play on any DVD player), the export process gobbles
up a HUGE amount of processor power. Meaning your laptop will be running at 100% for
hours. And since laptops generally do not have much breathing space inside, this can
overheat the parts inside and possibly reduce its life. So before you run out and buy the
fancy firewire cable, you might want to consider this and try to do your editing on a fast
desktop computer (Pentium IV, 2.5 GHz+ advisable).
Once you've got that set up then it becomes a software
issue. I noticed in Windows XP there was a free program called Movie Maker, but I had
problems with that. I'm not a great editor, but what worked well for me was Adobe Premier.
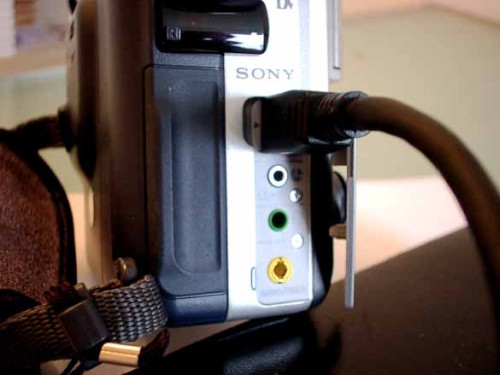 Of course, when doing fancy and
demanding computer stuff like this, you are better off using a Macintosh (the Macintosh
snobs sing Hurah), which are much better at handling stuff like this. Otherwise I used my
Adobe Premier for PC and simply had to learn when to constantly restart the program...
Once you've chosen your software (experimentation can be advisable - certainly wont hurt
your computer), usually what I find necessary is to turn on the software, plug the video
camera into the cable and computer, and then turn on your video camera to play mode. Or
some similar or logical mode (not record - unless you want to use it as a webcam, which I
think should be possible). If using XP then it should go through its usual procedure of
"found new hardware" etc. Let it install your device. Or perhaps the camera came
with an installation CD. Note that there is a difference between editing software and
installing drivers for your device. The "driver" is like instructions to your
operating system about the device. XP is usually quite rich in drivers so that it will
recognise and install almost anything you plug into it, so these installation CDs are
usually reserved for older versions of Windows, such as 98. Make sure to read the
instructions or manual first for how to hook up or install the device.
Once you've installed your device or once your computer has recognised it and installed
the driver automatically, you should be ready for downloading. You don't necessarily have
to turn on the program first. Some programs might be better for different things. For
example, I found one video editing program, although much more simple than the Adobe, was
good at rotating large sections of the image, because I was a bozo and held the camera on
its side, forgetting that TVs do not usually rotate so easily, and people don't like
rotating their heads likewise when watching your edited movies. Another program I found
good for exporting the clip into DVD format, while still another program was good for
importing into the computer video images from a VCR.
Once your device is installed and recognised by your computer and you are ready to try and
import/download the video images to your computer through your super fast and fancy
firewire capable, on your selected or experimenting software, you'll usually want to find
somewhere in the menu something like File > Capture Movie. Or maybe through some Import
function. But generally a Capture menu should do the trick, or possible Acquire.
Once you open your Capture menu, you should play around with the settings before
"capturing". For example, is your camera NTSC (US) or Pal (Europe)? Here you can
usually also set the image size, the quality of the sound (22MHz as opposed to 44MHz) and
other factors. The best bet is to simply capture little clips and then play them, or
export them afterwards to .avi to see how the quality looks. Make sure to play around with
this first, to establish the best possible option. Note also that higher quality settings
will inevitably require much more disk space. For my trip to Mexico, four tapes added up
to about a hundred gigabytes. Not a small amount of space. So you might want to have an
external harddrive for this purpose. And once you download all your clips and eventually
want to export them into a single file, the size of the exported file could also take up
many gigabytes. So make sure you have plenty of available storage space before you plan to
download a lot of videos.
When downloading, I find, even the great cameraman that I
am, that I only want to download selected clips. It is here that you'll probably learn to
appreciate movie editors, because it is a tricky business and one of the most important
parts of making a good movie. First you should have a rough idea of what you want to
accomplish. The tapes are not that expensive so you can always store them somewhere and
download other parts of your "raw footage" for other movies later.
So first I like to selectively download clips. On many programs you can press the Record
button, or sometimes the Play button in the software, and you'll be amazed to hear your
camera start playing. But I find that controlling the camera in this way through the
software generally leads to problems, and that the most error free and smooth way is to
press Play on the camera and then Record on the software. Keep in mind that it may take a
while for your camera to warm up and run smoothly, so press Play a bit before you want to
record, and then press Record (usually a red circle) a bit before the actual clip you want
to capture. Again, experiment in the beginning until you know what works best. Remember
that you are transferring a lot of info at a very high speed, so be patient with your
computer. Especially if it's not a particularly fast one.
You can fast forward or reverse to cue up to the parts you are interested in, and then
simply press Record once you want to capture, and Pause once you are done capturing. In
this manner you will save to your computer little video clips, which you will be editing
later (cutting to size, adding to other clips, etc.).
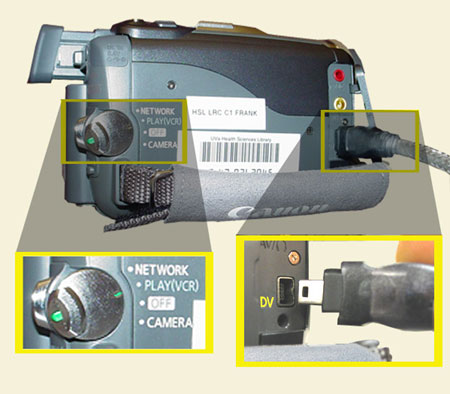 Once you've captured a small clip,
play it on your computer, test export it, and make sure all your settings are optimal
before you spend the next couple of hours downloading clips from your various tapes.
Another thing you might consider is to turn off the Preview. When recording from your
camera, if while recording you hear and see what you are downloading on your computer
screen, if your computer is not fast enough, previewing the imagines WHILE you are
downloading them can lead to little quirks in the clips you download, or even cause your
whole system to seize, freeze and crash. Most of these cameras should have a fancy little
TV which pops out for viewing while recording, so I prefer to use that for previewing
while downloading. Keep your mouse hovered over the Pause button while you watch your
little video camera TV, and press Pause (or the Escape key on the keyboard might work)
when you come to the end of your selected clip.
< edit down to an interesting size...
Once you've got your settings all right and have downloaded
your little clips to your computer, you can use the same or different software to start
editing your movie. Just open your software of choice, and usually go to File > Import,
and import the .avi or whatever file names you created when recording or capturing. You
are not actually importing the clips into your software, like converting them to another
format or anything, but simply placing them into the software like little thumbnails. The
hardest may be capturing the clips onto your computer. Once there, these large files can
be manipulated with little commands: insert that file here; cut the file at this point;
designate this segment to such and such a position. You are not actually cutting the files
and moving them around on the computer, but rather creating an instruction file, probably
of simple text format. This can also include special effects.
When you're done editing, cutting, moving around and adding special effects, THEN you are
ready to apply all these little instructions and create a new .avi or other file. It is
this Export process that will require a lot of computer power. Your software will be
following your commands to take certain segments of certain clips, move them to different
areas, add special effects... Heck, your Export command might even convert the quality and
format of the captured images, such as from NTSC to Pal, or from Pal to MPEG for the web,
where the resulting image will be much smaller than the original. This Export function you
can decide on at the end. You can even export your edited movie into different formats:
one for DVD, another for a smaller .avi file, and another as an mpeg file for the web. But
be prepared to let your computer run at full speed for several hours. Make sure to keep it
cool somehow, so you do not harm it.
Final Tip on Editing and Making a Movie
A good editing job makes a good movie. Nothing worse than
being invited to someone's house to watch home videos, where for hours you might listen
to: "Look, there is my hand. I'm a star eh? Oh, and there is our daughter when she
was 3. And here she 3.2 years old. Isn't she cute?" No, sorry, your
"movies" are pretty boring. Maybe interesting for you and for sentimental
reasons, once you're an old fart with your teeth fallen out and you want to go back in
time and reminisce about all the good times. But not necessarily interesting for your
friends.
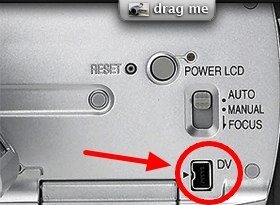 First of all, you want good raw
footage. Even though the tapes themselves can be fairly cheap, it doesn't make so much
sense to have hours and hours of useless footage. If you want to record you children as
they are growing up, why not make a movie while you're at it? Much more interesting to
view. Sit down like a happy loving family, write up a script together, prepare the
dialogue, make some props, plan out a script and final punchline... It's great fun. But
don't get too carried away with this initial process, because you may easily find yourself
spending an entire Saturday just preparing for the movie, and then the day is over, you
possibly haven't even started recording yet, and everyone has lost interest in your idea.
When filming, don't be a shy dork and just stand there, but move around. Get in a good
camera position - different for every scene. The top of a child's head is not so
interesting from the perspective of an adult, standing high above. Get down to their
level. Get below them even, to make them look like a giant. Compose your shots like you
should compose your photographs. Don't just position the head in the middle of the
viewfinder but look at the entire scene and balance the background with the foreground.
Shift to the left or right etc. so that the background does not somehow blend strangely
with the contours of their face. Look at the entire scene and create a balanced and
pleasant to look at composition before you start filming. You can even move things around
in the background. These are all things that the army in Hollywood regularly concern
themselves with. So take some time to compose properly before you start filming.
Occasionally you might consider using some of the special effects on your camera. Once
common one is Backlight, where you can increase the brightness of the foreground (lets say
a dark face) when there is some bright background affecting the light meter. Otherwise,
you can add plenty of effects later on the computer.
And for God sakes learn to hold your camera steady. Besides standing wherever they are
standing and automatically positioning the person's face in the middle of the viewfinder,
another mistake that beginner camerapeople do is to stare at the person while they are
talking and not really pay attention to their hand (holding the camera) wandering all over
the place. When you look through the viewfinder the person will remain in the same place,
and it may appear okay. But if your hand wanders and jiggles, and the frame of the
viewfinder moves around relative to the person, once you watch your movie on TV, the frame
of the TV will remain in one place while the person will be jiggling and moving all over.
Which can be quite annoying to watch. Especially if its supposed to be a movie, because
such movements will constantly remind the viewer that it is a cheesey homemade movie and
they will not be able to get absorbed into your movie like it is for real life or
something. Professionals can sometimes do this on purpose (mostly when pretending to be an
amateur cameraperson, as part a movie, or to be supposedly real cool and constantly
happening when filming music video moderators), but their movements are very intentional
and well composed. And forget about that wannabe artsy fartsy crap when you rotate the
camera at an angle. Always look at the viewfinder and keep conscious of the frame relative
to the composition within it, and pretend the frame is still and you are watching what you
are recording on a stagnant television.
Once you have put together some quality raw
footage, occasionally you might want to preview it to double check that you captured the
effect you were after. Or to motivate your actors and embolden them to express more
believable feeling etc. But when cueing back and previewing like this, make sure to leave
a little space afterwards, if necessary. When you record and then press pause, the camera
usually freezes the tape in a certain position. But when you press Stop and then cue back
to the same position, some cameras might step back a notch when getting into the Record
Pause state again, and inadvertently chop off or record overtop the tail end of your last
scene. So be careful of this.
When you are done with your raw footage, you might want to view all of it and think about
the movie you want to make. It is here where you might get some other ideas. Like record a
macro closeup of a ball and pretend it is an alien spaceship. Little snippets between
scenes or which you might find useful later once editing on the computer. Once you're
comfortable in your seat and editing, it is often too late to think of these little
snippets, for the props are all put away and everyone is on their couch reading and not
interested in doing any more acting.
For my Mexico clip, I find I am usually quite selective
before actually pressing Record on my camera. I don't like to pollute my tapes with a lot
of useless garbage. Even so, of the four and a half tapes or four and a half hours of
quality raw footage of beautiful California coastline, driving 120 miles through Arizona
and Grand Canyon country, and little dirt roads in Mexico, I edited all that to only one
and a half hours of final film. And even that I found was potentially a bit long. You will
find this out when you show other people later - when you see them yawning. It is best to
have short little clips or mini stories within your film. You might cut to a
"commercial break", and make goofy and humorous little skits selling such and
such. In movies, the story line always has ups and downs like on a roller coaster, to keep
the audience on the edge of their seat. Don't have two hours of footage on the same topic,
with the same consistent undrammatic events. Colour it up with this and that. Scare your
audience into keeping them awake. Edit down to the real and interesting juicy parts.
Occasionally you might film yourself and narrate your production, to explain things, and
by this once again colour up your film with different scenes etc. Always think from the
perspective of your future audience and never about how fantastic you are. A good musician
and entertainer concentrates on its audience and produces something interesting for them.
Think the same way.
Well, since I've been talking about making movies so much,
might as well upload my own, eh? This clip below is what my brother took from his digital
still camera (yes, the new ones, even mobile phones, can now make digital video images
with sound) while we launched my Europe travel
pages to Croatia. Driving around with that caravan beast in small European villages can be quite funny, but the
second half of it was drawn out and potentially boring. So I simply doubled the speed of
that section on the computer. But before doing so, I severed its link with the sound. So
the sound continues at the same speed, but the image is twice as fast. A rather simple
little clip but might give you some idea of how to try and make things interesting. Now to
figure out how to put my big Mexico flick up on the web...
In case you're
wondering how I embedded the video into this webpage, first I exported the clip to
"mpeg for the web", which automatically selected reduced quality and size
settings ideal for webpages.
Then I did a search on google for
embed
video in html
and the first link I
found provided me with the html script for this. Or look through further links. I imagine
you should easily find something.
Prevent Your Video Editing Software from Crashing
Does your video editing software crash when you try to work with it? I've
found out that the following can help alleviate the problem:
defragment your
disk. If the video files are splintered into a billion pieces, no wonder your software is
having problems working with them. Or you can see if Defraggler is still free, which can
defrag individual files so you don't have to wait forever while your entire computer
defrags (more info
on defragging in general)
make sure you
have enough free space on your harddrive to work with. You can clear up space on your
computer through the computer tips instructions directly above.
close all
programs you do not need to help increase your available RAM. You might even consider
buying more ram (more info on all this through the same computer tips link above).
these crashing
problems are more prone to happen on a PC. If you want to get serious about this sort of
computer work, try borrowing or buying a Mac. Otherwise remove some of the more fancy
video effects and simplify your movie.
another little
trick that can work is to piece together the clips that you want and export them into a
single movie file, defrag that, and then import that into a fresh file, working only with
a single and clean video file. You can then edit it further in the usual manner. Or you
can add some effects, and when it starts crashing, export it into a single video file,
defrag, import and start fresh again. The reason why it might be crashing is that you are
issuing too many fancy commands.
Good luck!
 Bleet about this page
More computer tips

KENAX
Translation Agency and Outsourcing
(programming work, graphics design, full list of outsourcing)
Copyright © KENAX, by Karel Kosman - All Rights Reserved Worldwide.
 When I was at my cousin's and
promised to use my flair for electronics to do the same for her, I found the same problem!
Is it supposed to be some secret conspiracy that the manufacturers fail to instruct their
customers of this incredibly important point?? My guess is that the software that comes
with the camera isn't fancy enough to do that, for which reason they do not explain it.
Otherwise, they might be forced to suggest certain software for this purpose, and then
they would want money for making such a suggestion, and since they didn't receive the
money, or it would be too much hassle to go through the process and write up a contract
etc., they can just be lazy and not mention anything. Well, these pages are not reserved
for my opinions of mega large corporations in general, so I'll just fast forward to the
important and juicy parts.
 Well, run out and buy one
dingaling! For a desktop I just took apart the computer and slid it into the slots, and
the thing worked like a dream. Obviously you want to turn off and disconnect from the
power supply your computer before doing something like this, but I found this surprisingly
easy, at a time when I was generally scared to deal with hardware and taking apart
computers. You can even remove it and take it to your friend's computer etc.
 Of course, when doing fancy and
demanding computer stuff like this, you are better off using a Macintosh (the Macintosh
snobs sing Hurah), which are much better at handling stuff like this. Otherwise I used my
Adobe Premier for PC and simply had to learn when to constantly restart the program...
 Once you've captured a small clip,
play it on your computer, test export it, and make sure all your settings are optimal
before you spend the next couple of hours downloading clips from your various tapes.
  First of all, you want good raw
footage. Even though the tapes themselves can be fairly cheap, it doesn't make so much
sense to have hours and hours of useless footage. If you want to record you children as
they are growing up, why not make a movie while you're at it? Much more interesting to
view. Sit down like a happy loving family, write up a script together, prepare the
dialogue, make some props, plan out a script and final punchline... It's great fun. But
don't get too carried away with this initial process, because you may easily find yourself
spending an entire Saturday just preparing for the movie, and then the day is over, you
possibly haven't even started recording yet, and everyone has lost interest in your idea.