Introductory Lessons in Viola and Violin - Made Easy
The first thing you need to learn is that this instrument is very delicate. It is made of parts which are not glued or nailed into place, nor should they be. If they fall down they are very difficult to put back properly and will probably have to be done by a paid professional.
Difference between a violin and viola
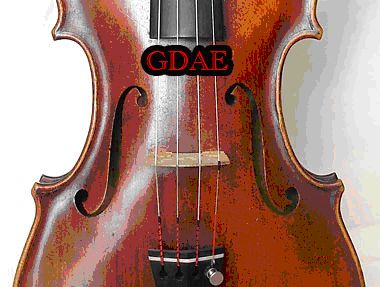
The viola has strings C G D A, going from left to right according to the pictures below, or from lowest sounding string to highest, while the viola has strings G D A E
Viola is left and violin is the picture to the right.
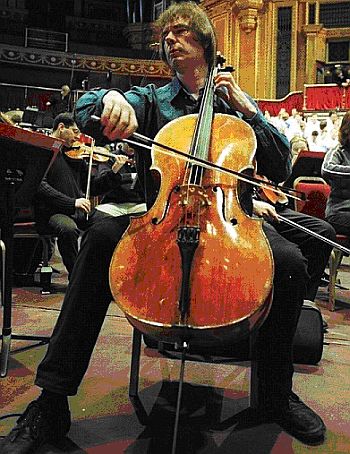
You will notice that the G D A strings are the same, essentially making the two the same instrument, but the viola has one lower string, minus the high string of the violin, while the violin has that high E string, minus the low C string. Because the viola has a lower sound, the size of the instrument is slightly larger. A cello (picture below) is like a very large viola and has strings C G D A, one octave below a viola. It has a very low sound. On a side note, the viola has the same strings as a mandola, while the violin has the same strings as a mandolin. Some say the only difference between a violin and a viola is that the violinist's head is larger (they tend to have bigger egos, and their head might look larger because the instrument is smaller).
 For me, I started with a violin, but the more I played the more I wished
I could go down in notes, while the highest sounding string could sound rather
shrieky and piercing. I think the violin is good for orchestras, where you have
a sea of high sounding instruments, such that the violin can float still above
that, filling auditoriums. But around the campfire with guitar and vocals, I
find the viola in a much nicer range, less overwhelming, more fitting with the
range played, and I enjoy occasionally diving down to that lowest sounding, C
note. Feels a little like playing the cello or bass.
For me, I started with a violin, but the more I played the more I wished
I could go down in notes, while the highest sounding string could sound rather
shrieky and piercing. I think the violin is good for orchestras, where you have
a sea of high sounding instruments, such that the violin can float still above
that, filling auditoriums. But around the campfire with guitar and vocals, I
find the viola in a much nicer range, less overwhelming, more fitting with the
range played, and I enjoy occasionally diving down to that lowest sounding, C
note. Feels a little like playing the cello or bass.
Sensitive and delicate parts
Below I'll explain in greater detail about maintenance, but there are a few things you should be particularly careful about before handling, as I'm sure you can't wait to start playing.
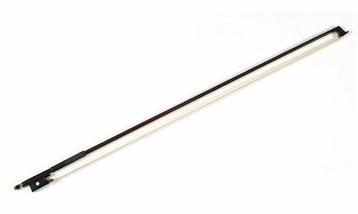
Bow

This is made from special wood, can easily break and not the cheapest to replace. From one end of the wood to the other are strings of horse hair. Do not touch these with your fingers or anything else, because grease or dirt can get on it and severely affect sound quality when the horse hairs brush against the strings. The individual horse hairs have on them even smaller hairs, which wear off over time, which means the hairs should be replaced. So play gently with them and do not press too hard down on the strings, otherwise you'll have to replace them sooner. As the little hairs wear away, the hairs will slip more easily against the string and not have such a full sound anymore, but have an increasingly screechy and slippery sound.
Violin
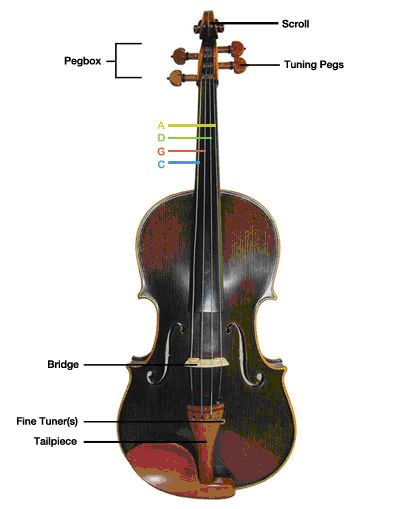
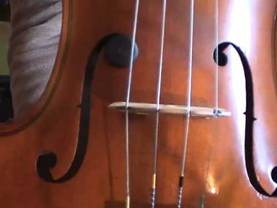
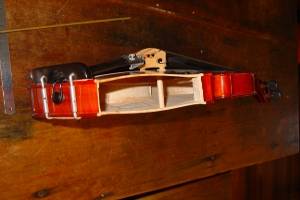
The bridge
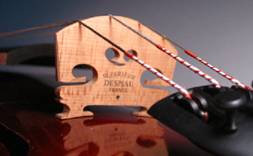
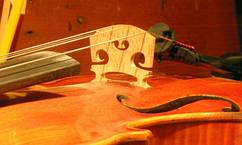
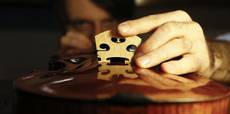
The bridge is a piece of wood which separates the front face of the violin from the strings. It lifts the strings up just the right amount above the fingerboard (the long neck on which you push down the strings with your finger tips, to change notes) so that you can play properly.
This bridge is not glued or nailed into place, nor should it be, because it is very important for the sound. It's placement is also very important. For these reasons it is very important to handle your violin with great care, so as not to move this bridge, or worse, cause it to fall down.
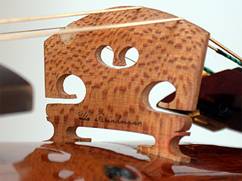
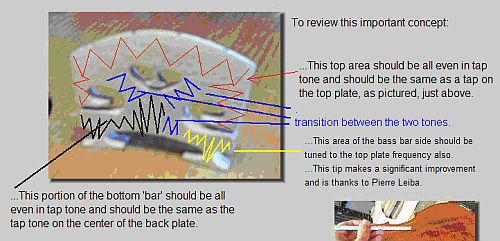
As shown in the picture above, the inner holes can be cut to be slightly larger, while the bridge over all can be cut or sanded down for optimum sound.
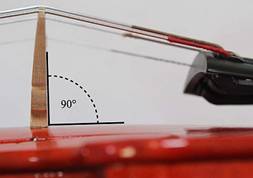
It should be located between the two notches in the f-holes (s-shaped cuts into the front face, picture directly above) and should be perfectly perpendicular to the surface of the front face:
The flat end of the bridge faces the back end of the violin, towards the musician's face, while the other side can be sanded down for optimum shape.
When you press down on a string along the fingerboard, you reduce the length of the vibrating part of the string, which makes it sound higher. The vibration of the string is transferred through the bridge and onto the front face. This string pressure adds a lot of pressure to the front face, which is made weaker by the f-holes<explained before?>.
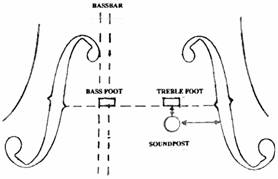
The sound post
To help support this pressure, a sound post is located underneath the soundpost, and is also held into place only by pressure – no glues or nails. The placement of the soundpost is very specific and requires a professional to do it right, although I've done it a few times myself, so you can read how later.
The sound post must be at a specific position and angle, cut down to just
the right size, with its grains of wood perpendicular to the grain of wood of
the violin. If, for example, you accidentally drop the violin and the shock
causes the bridge to drop, the strings are no longer applying pressure to the
front face and there is a good risk that the sound post will also drop. Once
that happens it is very difficult to put back into place. The French call the
soundpost "the heart". It is like the sweet spot on a tennis racket.
The string
vibration sent down along the bridge and into the front face now continues down
along the sound post,
 transferring the vibration to the back face, until the two
faces vibrate in harmony, the resonance amplified within the empty chamber,
producing its beautiful sound through the f-holes. If the soundpost is tilted
wrong, once you tighten the strings properly, under the pressure the corners of
the tilted soundpost can dig into the back and front faces and damage the
instrument. So please be aware of this and how careful you should be with this
instrument.
transferring the vibration to the back face, until the two
faces vibrate in harmony, the resonance amplified within the empty chamber,
producing its beautiful sound through the f-holes. If the soundpost is tilted
wrong, once you tighten the strings properly, under the pressure the corners of
the tilted soundpost can dig into the back and front faces and damage the
instrument. So please be aware of this and how careful you should be with this
instrument.
Preparing to play
Tuning
This is potentially one of the hardest things about this instrument. It is not like a guitar, which has frets along the fingerboard. With a guitar, if you press with your finger anywhere between the frets, the vibrating string length is set by one of the frets. But on a violin it is set by the exact placement of the finger. In essence, the finger itself acts as a fret. Therefore, without a good ear to hear where this is, learning this instrument can be quite difficult. Some beginners paste coloured dots onto the fingerboard. You can also practice first on the guitar to get used to what the individual notes or scales should sound like.
If you are putting in new strings (detailed instructions later), make sure to do them one at a time, to maintain that crucial pressure on the bridge and the soundpost.
Once the open strings are in tune, you will notice that the seventh half step of one string equals the open note of the next string.

When first tuning the fine tuner (knobs in picture above) should be almost completely loose, after which you tune up the big peg to slightly flat, then tune up to perfect using the fine tuner.
Whenever doing a lot of tuning work, make sure the strings have not pulled the bridge towards the end. Look at it from the side and make sure it remains perfectly perpendicular to the wood. If it isn't, adjust as explained later <or pic now>.
Bow preparation
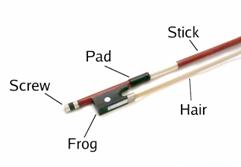
When not using the bow it should be loosened to relax the wood. The horse hairs should remain only slightly tight, not toughing the wood. When tightening, you rotate the knob at the end (labeled "screw" above), but as the hair gets tighter it adds increasing pressure onto the thread of this screw. Over time the thread could wear away, rip and need to be replaced. This is not an easy item to replace, so it is important, with your other hand/fingers, to apply equal pressure against the tightness of the hairs, as you twist the Screw and slide the Frog along the Stick. Failing to help the screw thread against this pressure will rip it sooner. The hairs should be fairly tight and almost parallel with the wood of the bow. The wood should never arch in the opposite direction as when it is completely loose. I usually apply less pressure than the below picture, as I usually play more softly. You will get a feel for how tight it should be, according to your style of playing.
Once you have your bow set up, pull out your rosin. Rosin is hardened honey, and when you rub the surface of it along the horse hairs, a light powder gets rubbed off onto the hairs. When you then slide that across the strings, you will see how the white powder coats the strings.
Over time, more powder will accumulate until it needs to be cleaned off the strings and replaced with a new, clean coating. When you lightly rub the strings with your fingers and feel it is somewhat choppy and clunked on with chunks of powder, it could be a good time to clean. To remove the powder simply put some spit between your finger tips and pinch slide them along where the strings need to be cleaned (the section which the bow slides across, above the f-holes). Your spit is also good for cleaning the wood. Do not use chemicals.
Once the strings are cleaned, dry them with a soft cloth and slide the bow across the section of the strings designed for that purpose, to give them a little coat. The higher sounding strings may require more frequent cleaning.
Getting ready to play
 One good way how to start learning this instrument is to
start with finger picking. This way you can practice quietly and get used to the
fingering placement and what the notes should sound like. You can have a
well-tuned guitar handy to compare sounds, to make sure you get the finger
placement right. Make sure not to pluck the string in the section across which
the bow is slid, to avoid getting grease from your fingers onto that section of
the strings.
One good way how to start learning this instrument is to
start with finger picking. This way you can practice quietly and get used to the
fingering placement and what the notes should sound like. You can have a
well-tuned guitar handy to compare sounds, to make sure you get the finger
placement right. Make sure not to pluck the string in the section across which
the bow is slid, to avoid getting grease from your fingers onto that section of
the strings.
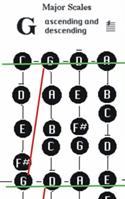
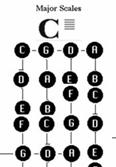
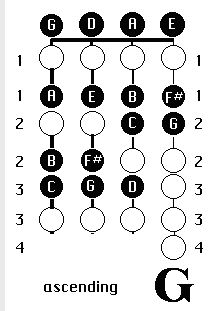
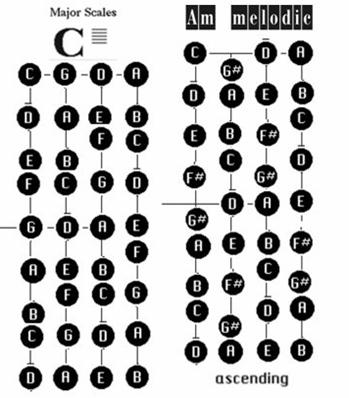
For the viola, you can start with the C scale below left. Notice that it has the same pattern as the G scale for the violin, the picture on the right.
Viola C major:
 Violin
G major:
Violin
G major:
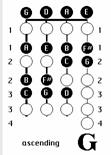
Note that, in the picture to the right, the black dots (G D A E) above the top line represent open strings, while those representing open strings in the picture to the left are actually on the top line (as will be the case below).
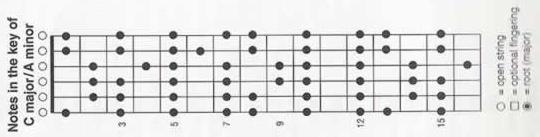
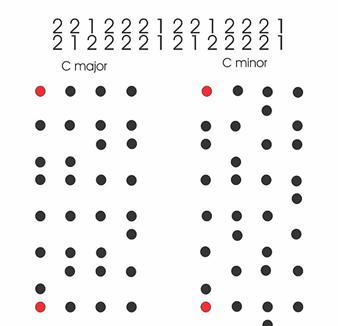
In fact, if we were to add strings to the left and right of those above, we would find an interesting pattern:
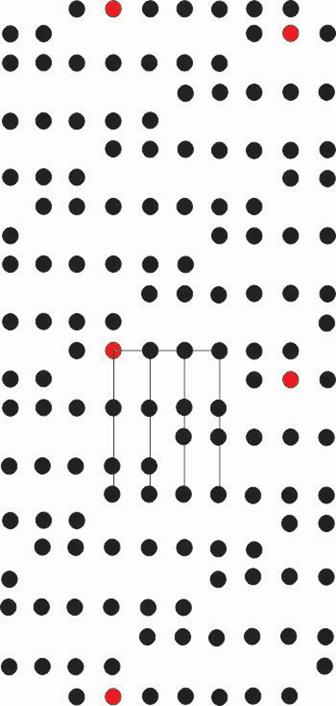
This is the pattern for the major scale, whereby the red dots represent some of the C notes. The grid in the centre represents the strings on a viola. For a violin the grid would shift one row to the right.
More will be explained about music theory and other scales later, but for now you can start with something easy, like a C scale for the viola or G scale for the violin (the pattern is the same, as explained above).
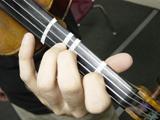
Holding the violin
Remember how we were talking about the vibrations and
resonance of the front and back faces? You do not want to muffle any of this
vibration by pressing any of those faces against your body.
 This is why they
come with shoulder and chin supports which do not touch this face. Even without
these supports you can still hold the instrument to minimize contact with the
wood surface.
This is why they
come with shoulder and chin supports which do not touch this face. Even without
these supports you can still hold the instrument to minimize contact with the
wood surface.
<more detail... look up material I found.>
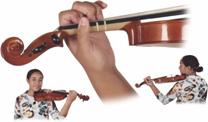
Holding the bow
<details..>
Playing with the bow
Now comes the fun and hard part for you, and potentially excruciating part for anyone else within earshot. If you are applying rosin to fresh or cleaned strings, you can practice holding the bow and sliding the hair across the section of strings above the f-holes. Slide from one end of the bow to the other, and experiment with applying different amounts of pressure. Start with the strings open. Keep practicing until you get a nice sound on all strings and along the entire section above the f-holes. Spread the powder evenly in that section and apply more rosin as needed. Practice it with some fingering if you like.
But before we get into fingering, lets analyse the bow technique some more. You should have noticed by now that the fingerboard is slightly arched, as is the bridge and subsequently the strings. This is to give room for you to slide across one string at a time. But notice that, if you get the angle just right, you can actually slide across two strings at a time. This gives a total of three string pairs that can be played at the same time. Practice getting these three angles and imagine that proper fingering can create small chords. You can slide the bow in one direction but change strings while sliding, moving from one string to the next until you get to the last string. Then you can pull/push the bow in the opposite direction, again moving from one string to the next until you get to the last string. You can go back and forth between these end strings, at various speeds, and imagine that your fingers could be placed to produce a sort of four string chord. Starting to see the potential of this beautiful instrument?
Then there is staccato, whereby you bounce the hair off the string. When bouncing you need to slide slightly at the same time, to create volume.
Note also the different tones you can achieve depending on how close the bow slides to the bridge. Higher tones are achieved closer to the bridge, while lower, deeper sounds are attained closer to the fingerboard.
Play around with it and explore – just be careful not to get too close with the bow to the bridge. Because a horse hair might get caught where the string straps over the bridge, and break. Difficult to find someone to replace them, and the fewer hairs you have the less full will be the sound produced.
Note that the bow for a viola is stockier than for a violin and the hairs are broader and more abundant.
Fingering
Now that you've played around with the bow and gotten comfortable with it, I am sure you tried a little fingering while training. A lot of emotion can be put into the style of sliding< the bow across the strings, while the fingers can produce feeling in a different way.
It is important to learn how to hold everything properly, because bad habits are hard to break. <details>
So before you start getting serious with learning scales, make sure you have your posture right. Practice the reach of your fingers across different parts of the fingerboard and get an idea what is a comfortable position. I found there are different schools of thought concerning this. Classical violin calls for straight posture and is quite strict. The Indians like to have the peg end wedged in their toes and the base pressed against their stomach, while sitting, this posture allowing them to slide their fingers along the fingerboard with greater ease. I saw one player standing, the base pushed against his abdomen, the violin jutting out perpendicular to his body, the bow going up and down. He looked very comfortable and at ease. Sometimes I'll play while lying in bed, back propped up on two pillows, left elbow resting on the bed and comfortably practicing my fingering. The thing about fingering is that it is like typing. The more you practice, the more you develop finger memory. It becomes automatic and you don't have to think about or look at it. You can pluck away quietly while watching TV.
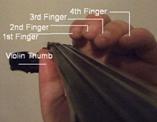
Occasionally you will want to play chords or two strings at a time, so practice forming chords and move from string to string. You will want each finger touching only one string. If it even slightly touches a neighbouring string, it will disrupt the string's resonance and put off a horrid sound. The tip segment of each finger should be roughly perpendicular to the fingerboard.

Another good thing to practice is the slide. A nice thing of not having frets is sliding your finger placement up and down the string. If you are aiming for a B note, you could start at A and slide the same finger up to the B position, instead of changing fingers to get to the next note. Or you can start with a C and slide that finger down to a B. See how far you can slide with a single finger, in either direction. Try it with different fingers, different strings, along different stretches of reachable string. Perhaps even try it in section 4, on the other end of the fingerboard, in case you ever want to get that high. That is for very experienced players.
While practicing the different fingering positions and approaches, be aware of your own posture. Choose something that feels comfortable to you. <mention the strict version in detail, or other details> And be aware of how you are holding the neck, or using your thumb for support when reaching for those more difficult places. Your posture could also be important for the style of music you like to play. For example, the strict, classical posture could very well be necessary when playing classical type music. That does not use the slide as much, which requires a different grip.
And lastly, the beautiful vibrato. What would a guitar sound like if you never bent a note? For sliding and vibrato, even posture and much more, a good place to visit is youtube. Tons of teachers out there glad to give free advice. You can spend hours watching the technique of professionals. Everyone has their own style, so soak it up to see which direction you want to go. The vibrato is a trick of the wrist, and simply takes time to develop. Apparently the neck grip for vibrato is also important, to not develop a bad habit, so make sure to study all the postures and understand <detail..> . There are two ways you can create a vibrato sound, and either is more advantageous depending on where you are working along the fingerboard. And both sound somewhat different. One is to shake the wrist somewhat, as if you were waving your flat palm, threatening to slap someone in the face. It takes a bit of time to get the feel of it, but it will come to you. And it is different for different strings, fingers, location along the fingerboard and other factors. The other is to pull or push the finger to or away from your hand. Bending the string like Jimmie would crank it on the guitar.
If you're up for it you could practice chords as well, but that is generally more difficult, and it is better to produce a single, hovering, beautiful note than a lot of boastful screeching. But at least you know all the potential to discover.
Once you learn how to play nice sounding individual notes or note pairs, and before you move on to scales and complicated theory, you can start with simple melodies that you know in your head. Or you can play along with the mp3. Tune it to the mp3 and match the pitch of the different notes. This way you can start to have fun, even display your progress, and work on scales and training exercises in between.
Music theory
Of the 9 other instruments I learned, I never developed an interest in theory, but I think it will help you understand this instrument better. I like to imagine things visually, and managed to circumvent the traditional note-displaying method.
First of all, what is a scale, or notes? Lets start with the basic C scale: C D E F G A B. As opposed to the A, which would be A B C# D E F# G#, where # signifies a sharp (b signifying a flat).
A flat or a sharp is a half step down or up. Lets look at a guitar fret board or piano.
Moving up or down one fret (right or left according to the picture of a guitar fretboard above, the open string/tuning end to the left), or key on the piano, signifies a half step. When going from one note to the next, such as from A to B, one or two half-steps are required. Most note changes require two half steps, but the B and E require only one half step to get to C or F (this is the same on all instruments).
You may have noticed that there are 7 notes. One can say starting from A and ending in G. If it starts at F, it will end at E. It is equivalent to the do-re-mi-fa-so-la-ti-do. The 'do' at the end is the same note as the do at the bottom, but an octave higher. It is the eighth note in that formation and the beginning of the next section of that scale.
Now, lets take our A and C scale samples above (C D E F G A B and A B C# D E F# G#) and see if we can find a pattern. Yes, the progression of half steps in a major scale is:
2212221
Meaning, iIt takes two half steps to get from C to D, and again to E, then one half step to F, two half steps between notes until B, then one last half step to start the next cycle. 12 half steps in total to close the loop. You can test this out on the A scale, since there are two half steps from A to B, but because a natural C is only one half step above a B, since we need to go two half steps for the next note in our 2212221 pattern, it pushes the next note up to a sharp (C#). Note that C# is the same as a Db, which is a half note above a C and half below a D. It is the same fret or key, in between two natural notes.
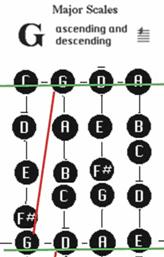
Okay, that is a lot to chew on. I suggest you let all that soak in before we move on. Note that this concerns a MAJOR scale. You can spend a lot of time working on this and it is a good place to start. This is how it looks on a violin's imaginary fretboard, using the G violin scale as an example:
But wait, there is a nice shortcut! Before we do that though we have to trudge through some more theory.
Minor scales
Well, major scales sound all normal and dandy, but you can play around with that in wonderful ways. Lets start with the first, simple step, the minor chord.
The definition of a minor scale is that "it is the same as a major scale but the third of seven notes is dropped down one half note".
For our C example then (which is nice, because there are no sharps or flats), the third note is an E, which now drops down to a D# (same as Eb), giving us:
 C D Eb F G A B
If you want to think of it in another way, if the number of half steps in a major scale is
2212221
It is
2122221
for the minor scale.
To see the difference visually:
you can see how the third note is dropped down one half note on our imaginary fret board.
The top row is understood as open strings on a viola. The red would be a C, open. Play these two, taking turns between them, and get a feel for what a minor chord sounds like compared to a major one. A little bit sadder, isn't it? Practicing these two side by side is good to train your ears on the difference between the two. Eventually you'll be good enough to think G, but just minor it. But again, just keep building the finger memory and don't let it intimidate you. Start simple and make it more complicated over time.
And here is the little trick! There's this strange beast called a
natural minor: 1234567 (the third, sixth and seventh notes are half steps lower)
So not only did the third note get degraded one half step in the ranks, so did notes 6 and 7, meaning
C D Eb F G Ab Bb
Meanwhile, around the corner we have lurking yet another beast:
melodic
minor:
ascending: 1234567
descending: 1234567
This monster changes stride when going up or down. Notice that the descending part of the melodic minor is the same as the natural minor.
You may be ready to throw in the towel now, getting so complicated, but wait! The universe is miraculously beautiful and everything has a master plan. It just turns out that this 1234567 is actually the same as another major scale. Fancy that, eh? And they're always three half steps apart, the major three half steps above the minor, playing the roll of the descending part. An Aminor, therefore, will be like an A major scale going up (ascending), except that the third note drops down one half note, meaning
A B C D E F# G# (Amajor scale is A B C# D E F# G#)
but going down (descending) as a C major scale.
Visually, this wonderful, dancing duo would look like:
This is wonderful news,
because the two patterns don't look that different, but you get to practice a
major scale, natural and melodic minor scale at the same time. Woooohoo, things
are rolling now!
If you want to get fancy
you can visualise the three half-step matching as follows:
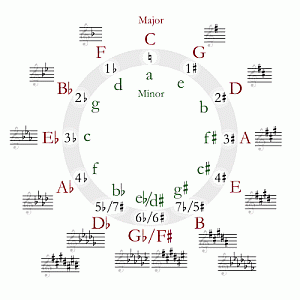
Thus, a Gminor would be matched up with a Bb major scale, which would be the descending part of a G melodic minor scale.
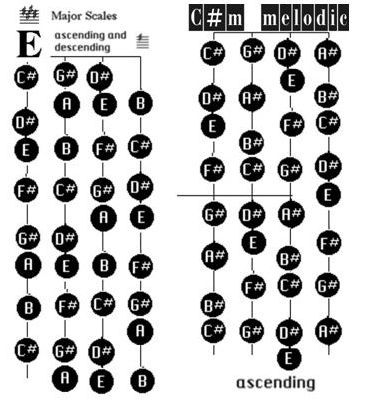
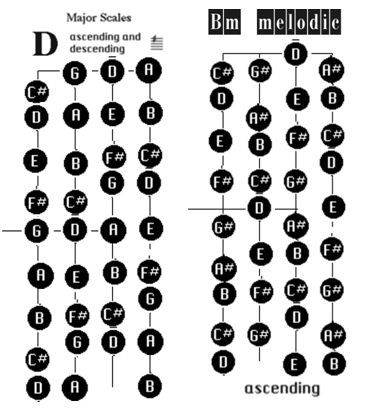
In addition to the C/Am combination I prepared above, I put together the following other matchings (for viola only so far, but violin explained shortly afterwards):
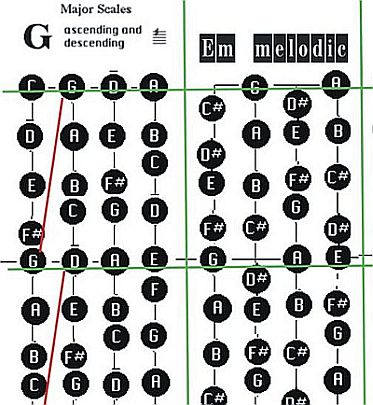  |
Now before we get all jumbled with trying to remember all of the various patterns, lets step back for a moment and view the greater picture. As I was learning about the various patterns, I started to suspect their relationship and interconnectedness. So I did an experiment by adding more strings on either side of my viola, and sure enough, an interesting pattern did indeed form:
The red dots are the occasional marked C notes. As mentioned above, the grid in the centre represents the open viola strings. Notice the same pattern as the C scale. If you slide the string pattern one to the right, it becomes the C scale on a violin, since the above pattern is for a C (major). If we slide the grid up two half steps from its original C viola position, you get the D major for viola (the black dots representing the fingering positions relative to the open strings, the top line of the grid. Slide up two more half steps to get the pattern for the E scale, and so on. Or shift the grid down one half step to get B instead, since that note is one half step lower than a C.
Alternatively, we can shift the grid one string to the left, to give us the pattern for a G scale (viola):
You can apply the same principle for the violin, whereby the violin C major scale starts by shifting the original grid one to the right, considering the higher strings for that instrument.
At least this way you will see a pattern, and you can continue the pattern up along the fingerboard (you have to imagine the strings continuing downwards along the grid).
I have yet to make one for minor, or some of the other minors, like gypsy minor (explained below). I am sure the pattern will be equally interesting. I'll also make picture patterns for the other minor melodic and major scales.
Other minor scales
If you wanna get fancier, here's some candy.
harmonic minor: 1234567 (used for the seventh chord, ie-Cm7)
A
seventh is where the 7th is a flat ???
A
diminished chord is a minor chord with a lowered fifth.
And
augmented triad/chord has 5 sharp (#).
Diminished triad is both 3 and 5 flat (b).
Gypsy minor scale: C D E♭ F♯ G A♭ B C (123b4s56b7) 1234567
|
|
|
|
|
|